DIY YARN WRAPPED WIRE ARROW

arrow1

Have you guys seen those yarn wrapped wire words all over pinterest? Well, those were obviously the inspiration for this little project, but I was envisioning something a little different for our bedroom. So I played around with a few shapes and landed on an arrow. I actually thought this project would be a bit tedious. I was picturing myself wrapping wire with yarn forever. But I was pleasantly surprised to see that it went super fast! I had that baby wrapped in under an hour. BAM. Maybe I should make more of these. 

………………………………………………..

what you’ll need:

- wire. I picked up the thickest gauge craft wire I could find at Michaels. It’s still a bit flimsy, so if you can get your hands on something thicker, it would be better. I’ve seen people use wire re-enforced clothesline. But I don’t think it’s easy to find. 

- a nice, thick and bulky yarn. Your run of the mill, regular yarn is too thin and will just add to the flimsiness. 

- super glue

- needle nose pliers (optional)

- scissors

………………………………………………..

Now continue reading after the jump to see how to do it!

arrow2
arrow3

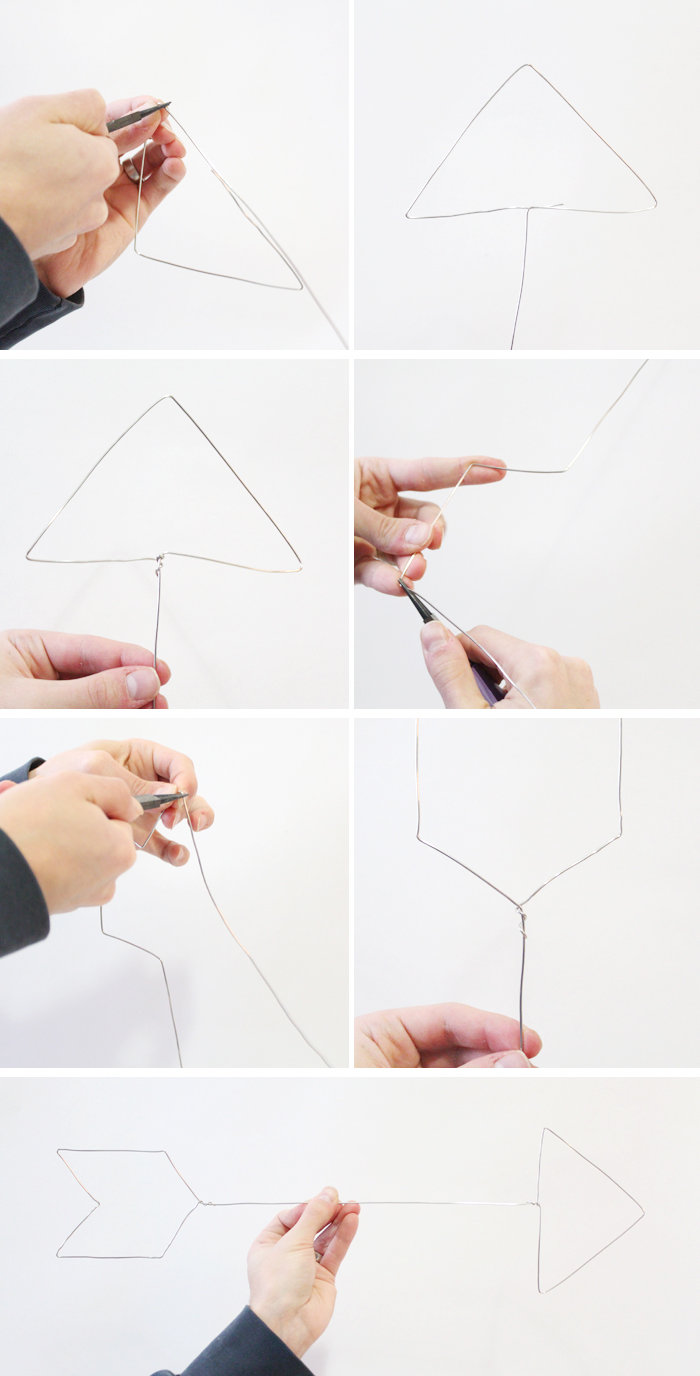
1. Cut a 26” piece of wire. Do your best to make it as straight as possible. Get out all of those kinks! Don’t worry if it’s not completely perfect, though. You’ll most likely have to adjust throughout anyway. 

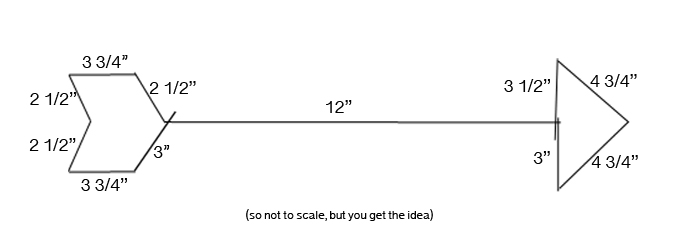
2. Measure and bend into your arrow shape, following the diagram I included above. You can use a pair of needle nose pliers, or just your fingers. It works just as well, to be honest. 

3. Take that extra 1/2” left at both the beginning and end points, and wrap them around the main part of the arrow to secure. 

arrow4

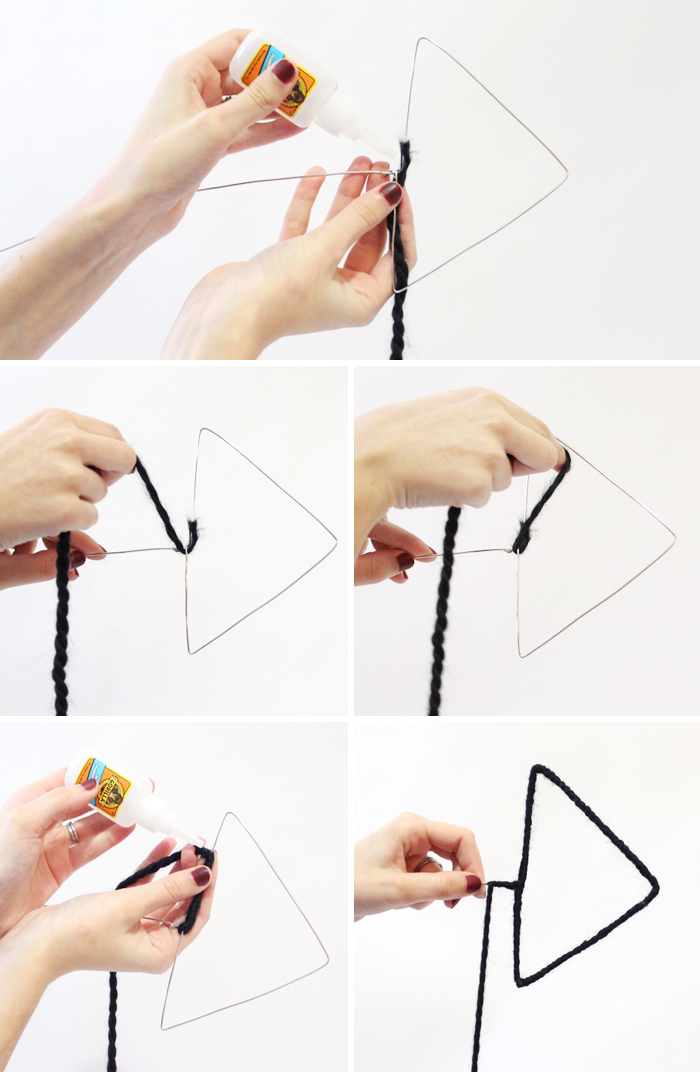
4. Time to start wrapping! Heres how to hide your yarn ends -start by placing your yarn alongside the length of the wire, right near where you joined the wire together in the middle. Make sure it is going in the opposite direction to which you are going to wrap. Glue down. Once dry, bring the yarn behind, up, and around the middle, covering the joint. Start wrapping, so that you end up covering that glued tail end. 

5. Keep wrapping around the wire. Place a dab of glue every couple of inches, and at every corner. 

6. When you get all the way around the β€œtriangle”, just continue right onto the β€œstick”. Continue wrapping and glueing. 

arrow5

7. When you want to change colors, theres no need to stop and cut your original yarn. First, glue your original yarn where you stop and want to switch. 

8. While pulling / holding the original yarn alongside the length of the wire, start your next color by hiding the end just like you did in the beginning. Glue down along the length of the wire, going in the wrong direction. Once dry, start wrapping back along the right way, covering both that glued end and the original yarn. 

9. When you are done with your color, glue down and leave a small tail. Pick up your original yarn and continue wrapping on, covering that tail. 

10. Repeat this for as many different times and colors you want to add!

11. Continue on wrapping around the last part of the β€œstick” and onto the β€œfeather”. You’re in the home stretch now! When you get all the way done, glue and snip. 

arrow6

And that’s it! Admire your handiwork. Comment on how that didn’t take much time at all. Make another one! Hang them up. 

Tip - because it is so lightweight, try using sewing pins to hang your arrow instead of nails. They’ll be nearly invisible because they’re so small, and they will leave a lot smaller holes in your wall. Yay!

IN MY LIFE

insta277

Β» Lately, I’ve really been loving blogs with clean, simple, greyscale layouts. So on a whim late last night, I gave the ole blog here a little makeover. The layout is still the same, only cosmetic changes have been made. And hey, I tend to change my mind a lot, so who knows - I may be back to color by spring. But for now I thought I would give this a go. (And I updated the shop to match!)

Β» I also switched over to Passionfruit for sponsorships. You can now view all advertising information, and apply for a spot, right from my sponsor page on the left hand sidebar!

Β» A couple of gorgeous Etsy treasuries that have featured shopHollyDolly - morning colors and looking for yes

Β» Speaking of Etsy treasuries, I’ve recently started making some myself again! You can view all of my lists here. 

Β» Wishlist wants : this kimono, this jacket, this dress,  and these flats

Β» Want an instant home makeover, but don’t want to commit? Washi tape. My dresser looks brand new. 

Β» Are you on Instagram? Follow along! My username is : hollyjollydolly


FROM BOO

fuzzydeer1

Back in the beginning of December, Boo and I were watching the Glee Chrsitmas episode. Honestly, it was a horrible episode. But at one point Santana was wearing this really awesome fuzzy deer sweater. Without even thinking, I said out loud to myself -β€œoooooooh I real like that sweater”. As I usually do. I always comment on clothing in TV shows. Obvs. Anyway, right after that, I thought that Boo had resorted to playing games on his iPad. But really, he was doing a few google searches to try and find that sweater. 

FYI - it’s from Guess. And my husband is kinda awesome. 

fuzzydeer2

fuzzydeer3

sweater: Guess

hat: Urban Outfitters

glasses: Warby Parker

jeans: Urban Outfitters

booties: Target

SNAPSHOTS

bwlife1

bwlife2

bwlife3

bwlife4

bwlife5

bwlife6

It’s official, Henry really does not like the snow. Like, really really. Don’t worry - he was only out there for a minute and then he was back to being warm and cozy in his favorite…. cardboard box.

I really don’t blame him though. We are now burred in snow and hoping that there is no reason to go outside into the negative degree temperatures. I’d be happy with this weekend consisting only of pajamas and soup and netflix. 

Stay warm, my friends. 

HELLO 2014! MEET MY NEW LOVE.

tulle1

For a long time I’ve longed for a big fluffy tulle skirt. I came close to purchasing different ones here and there. I’ve even thought about making one, and then just… didn’t. Because I’m lazy. And then I spotted this one, and with the help of a christmas gift card, I made my tulle skirt dreams come true. 

It’s real love. 

And I must say, a real good outfit start to 2014. 

tulle2

tulle3

tulle4

tulle5

tulle6

tulle7

tulle8

hat: Urban Outfitters

scarf: ASOS

glasses: Warby Parker

tee: Zara

tulle skirt: Urban Outfitters

mini skirt (under tulle): American Apparel

tights: H&M

booties: Target

Etsy Favorites : Volume Eight

etsy8

1. Cropped Sweater by Remember A Day 2. Body Chain by Clydes Rebirth 3. Rose Quartz Necklace by Kalinkati

4. Chunky Tie Scarf by Ozetta 5. Clear Clutch with Pouch by Estoite 6. Bumble Bee Bobby Pins by Vintage in Color

I received an Etsy gift card for Christmas and have been painstakinly trying to decided exactly what to get. My favorites are full of such amazing things! It doesn’t help that I’m a notoriously indecisive person. Here are just a few of the things that I’m thinking about.